| Published: |
Retro Pie is a complete software system for emulating many old video game systems on modern computers. It is specifically designed for the Raspberry Pi line of tiny computers, but it also can be installed on ODROID hand-held computers and also any desktop or laptop running Debian or an Ubuntu-based operating system.
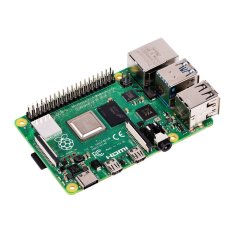
Raspberry Pi is a line of tiny single-board computers designed to be cheap but functional and self-contained. The main board has CPU, GPU, and I/O ports, but the power supply and all peripherals must be added externally. The main board also has a number of "GPIO" pins on it, which can be hooked up directly to inputs and outputs of digital devices such as sensors and robotic actuators. Raspberry Pi is a great platform for projects such as:
In this how-to article, I will walk you through the process of installing Retro Pie on a brand-new Raspberry Pi, in order to turn your living room TV into a video game console to run old video games via emulation.
A list of game systems supported by Retro Pie is on Retro Pie's web site.
The short URL for this page is: go.glump.net/retropie
 For this project you should buy a Raspberry Pi 3 or 4 model, and all the accessories you need to build an enclosed system and connect it to some kind of display.
| Budget system | Raspberry Pi 3 B + (Plus) Budget Kit from pishop.us ($55) |
| Deluxe system | Rasperry Pi 4B Starter Kit from pishop.us ($65 to $115) --- Choose the model with 2GB of RAM if you will only ever use the Raspberry Pi with RetroPie or other small software systems. If you might in the future build a full desktop computer, buy the 4GB or 8GB model. |
I bought my Raspberry Pi unit from pishop.us. You might buy it from another store depending on your location and your preferences.
When you are reading this in the future, those particular bundles may not exist. Be sure that your bundle or your order for individual parts includes:
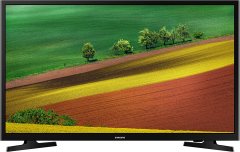
 Raspberry Pi boards support HDMI output carrying audio and video on the same cable. A living room / gaming TV is your best bet for a display.
The Pi board also includes a TRRS 3.5mm socket carring analog audio (stereo) and composite video. You can optionally buy an adapter to hook that up to a separate audio system, and you can also use this port to drive an old composite video display or an old TV that has composite input.
Even though many old games were designed with old-fashioned TVs in mind, I believe you'll get better results with a modern HDMI display or TV, compared to using a composite input display. And your whole system will weigh a lot less if you don't use a bulky old CRT display!
You will need a laptop or desktop system to download and install the Retro Pie software onto your Raspberry Pi's memory card. The installation process supports Windows, Linux, and MacOS.
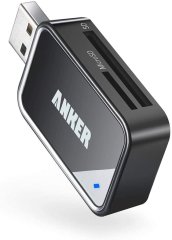
 Your Raspberry Pi kit probably comes with this, or you may have one already. Or your laptop might have a MicroSD slot built into it. Make sure you have a means of connecting the Raspberry Pi's MicroSD card to your Internet computer, for installing the software.
 You will need some kind of game controller. It needs at least as many buttons as the emulated systems you want to run. It helps a lot if it has at least one extra button to serve as system interrupt command (to pull up the menu). The more buttons the better.
For running games on emulators for old 16-bit game systems, I find that a Gravis Gamepad USB works great. Check your favorite electronics store.
For normal operation, Retro Pie is designed to work with a game controller and does not require a keyboard. However, a keyboard is required to perform the initial network configuration. It is also required if you want to run game system emulators for systems that originally had a built-in keyboard, such as the Commodore 64.
I recommend you buy a USB keyboard, or borrow one from another computer in your house just for the initial setup.
Bluetooth devices may be tricky to setup. See the page about Bluetooth in the Retro Pie manual. We will not cover them in this basic guide.
The procedure outlined below is specifically for the Pishop.us's Raspberry Pi 4B Starter Kit. Your model may be slightly different.
To assemble the computer itself, make sure you have the following parts ready on your desk:
The Pishop.us case is held together by a couple of tabs. There are no screws.
On one of the small sides of the case you will find holes for the Pi's USB and Ethernet ports. Locate the two tabs coming down from the top half of the case, latched onto the bottom half. Use a small tool like a flat-head screwdriver to pop the tabs out and wiggle the top off the case.
Pull each of the rubber feet off of the packing paper they came with, and stick them onto the four indentations on the bottom of the case. They are self-adhesive, so make sure you line them up exactly right before you push down.
Look at your heat sinks and determine which goes on which chip on your board. If you have a Raspberry Pi 4B, you can refer to my pictures below.
If you have a different model, look for forum posts or videos on the Internet that show where the heat sinks should go.
For each heat sink, use your fingernail to peel off the packing plastic, then carefully line it up with the appropriate chip (sticky side down) and press down firmly for a few seconds to make sure it sticks.
Line up the USB and Ethernet ports with their holes in the bottom of the case. With the USB and Ethernet ports at your right, slide the board into the case, starting with the edge facing you and then rotating the rest of the board down so that it lays flat.
There are no screws or fasteners. The top part of the case will hold the board in place.
Line up the tabs on the top part of the case with the edge of the bottom of the case that has the holes for the USB and Ethernet ports. Drop the opposite edge in place, then rotate the tabs into place. You might have to push in on the tabs a little from the outside, to get them to slide past the edge into their proper positions.
You're done assembling the computer now!
Start up your laptop or laptop computer. Connect your RaspberryPi's blank MicroSD card to your computer.
Open your browser and navigate to the Raspberry Pi Downloads page. Download, install, and run the "Raspberry Pi Imager" appropriate for this computer's operating system.
When Raspberry Pi Imager comes up, it will ask you which "Operating System" you want, and which "SD Card" to write to.
For Operating System, scroll down to "RetroPie", select that, and then in the sub-menu, choose the correct version for the Raspberry Pi model you are using.
Next, click "SD Card" and select your empty MicroSD card from the list.
To make sure you select the correct device, make sure the icon (SD Card, or USB, or Thunderbolt, or something else) matches the actual port on your computer that you're using. In my example, my card is plugged into a USB port. Also, check the size: my card is 32GB, and the item I selected as my target is listed as "31.9GB" size. (It's okay if it's close but not exactly the nominal size.)
Raspberry Pi Imager will ask if you are sure you want to erase the target device and load the new software on it.
It will take several minutes to write the software image to the MicroSD card.
Find the recessed MicroSD card port on the bottom of your Raspberry Pi (opposite from the side with the USB and Ethernet ports), and insert your MicroSD card into it.
Hookup the power adapter, HDMI video cable to your Raspberry Pi. Then your game controller and USB keyboard (not shown below).
Hookup the HDMI cable to your display.
Then plug in the power to an AC socket.
The Raspberry Pi does not have a power button. It will start booting up immediately after the power supply is connected
Make sure your display is powered up before you connect your Raspberry Pi to its power source. If you don't, the Pi might boot up with no display enabled.
When it's done starting up, the first thing RetroPie will do it ask you to configure your game controller. Press and hold any button for 1 second to get started.
For a Gravis Gamepad, I will only configure Up, Down, Left, Right, Start, Select, A, B, X, Y, Left Shoulder, and Right Shoulder for in-game input events. When you run out of in-game input events you can configure, hold any button for 1 second, let go, and repeat, until you get to the bottom of the list.
Now, for my Gravis Gamepad, I used Left Trigger (Button 6) as my "Hotkey Enable" button.
To return to the controller configuration again in the future, activate the Main Menu from the Retro Pie home screen using the Start button on your controller, then navigate to
Configure Input.
After the controller is configured, you will be on the Retro Pie home screen and only RetroPie (Configuration) will be displayed. This is because you haven't loaded any game ROM images onto the system yet. You have to configure your home network on the Raspberry Pi, and enable its SSH server so that you can copy games to the system across your home network.
If you are using Ethernet instead of Wifi to connect to your home network, you can skip the Wifi configuration step and continue with the instructions for enabling SSH.
Activate RetroPie (Configuration) with the A button on your controller.
Navigate to RASPPI-CONFIG and activate that with the A button.
Make sure your USB keyboard is plugged in and use it to navigate to Network Options → Wi-fi
Follow the on-screen instructions to input your Wifi access point's network name and password.
Exit out of Rasppi-Config, and use the Start button on your game controller to activate the Retro Pie home screen. Navigate using the Up and Down buttons to Quit, then activate with A button. Then select Restart System, and finally choose Yes at the confirmation prompt.
After the system comes back up, navigate into Rasppi-Config again. Run the "Show IP" command.
You should get a result at the top of the dialog box with an IP address after "Your IP is: ________".
Make a note of that IP address. You will use it later to connect via SSH.
If you don't have an IP address now, you should consult the Retro PIE manual for help.
Back in Rasppi-Config, navigate using your USB keyboard to Interfacing Options → SSH. You will be prompted about whether you really want to enable SSH or not; enable it.
Now you can unplug your USB keyboard and put it away, if you were not going to use it with games.
I can't tell you the best place to get ROM images from the Internet, but here are some tips:
Is downloading game ROM images legal? That depends on your perspective.
- If you only download game ROM images that are marketed as free and open source software, you should have no concerns. (These would be mostly newer home-brew games for old systems.)
- If you actually own a copy of the game on a ROM cartridge or optical disc from a retail package, you might consider yourself licensed to do whatever you want with that software in your own home -- even if you used the Internet to get a copy of the game because it's inconvenient to read the original media.
- Many many old video games are "abandonware". It's virtually impossible to find the party responsible for these games' copyright and actually buy a new license for it. (Remember though, many old games are not abandoned in this way.)
- And, finally, you might just choose not to respect copyright.
Start with a Duck Duck Go search. For example, if you want to get Nightmare on Elm Street for Nintendo Entertainment System, try searching for
nightmare on elm street nes rom
If you find a game catalog site that offers a ROM image as an executable file, stop and never go back to that site again. It's probably trying to get you to install malware. It is an executable file if it ends with one of the following file extensions:
batcmdcomdebdmgexerpmshvbs
If you get a
zipfile, look inside it and extract the payload. The actual game ROM image will have an extension likebinorimgor something else, depending on the system it's for.
There is a list of systems that Retro Pie can emulate, on its web site. It also lists the image file formats these emulated systems expect.
The following systems also need a BIOS/firmware ROM image to boot up the the emulator. They can't be included with the emulator because like the games these BIOS images are copyrighted software that the emulator authors don't have license to distribute.
Requires BIOS/firmware image: 3do ; Amiga ; Atari 5200, 8 bit ; Atari 7800 ; Colecovision ; Color Computer ; Dragon 32 ; Dreamcast ; Game Boy Advance ; Intellivision ; Macintosh ; MAME ; Neo Geo ; Nintendo Entertainment System ; PC Engine/TurboGrafx-16 ; PlayStation 1 ; Sega CD ; TI-99/4A ; TRS-80 ; Videopac/Odyssey 2
If you want to run any games from these systems, you also need to find and download one BIOS/firmware image for that system. (Search the web for it the way you search for games.)
See the Retro Pie manual page under
Emulators → [the system you're interested in]for exactly how to install that system's BIOS image.
Leave the Raspberry Pi running, and go back to your laptop or desktop computer. Find a program for transferring files via SFTP.
If you're on Windows, WinSCP is a good SFTP client program. AlternativeTo.net has other options for other operating systems.
Open your SFTP program and create a profile. Make sure you're using SFTP protocol, and fill in hostname (from the "Show IP" command earlier). Retro Pie's default login is:
| username | pi |
| password | raspberry |
You might be prompted to accept a new SSH host key. Click Yes or OK.
Once you're connected, navigate on the Local side to the folder where you've downloaded your game ROM images to. Then on the Remote side (the Raspberry Pi), navigate to /home/pi/RetroPie/roms
You'll notice that each system Retro Pie can emulate has one folder under
roms. You must copy the ROM image files you downloaded to the correct folder for the game system that runs each ROM image.
In my example in the screen shot, you see I have three games downloaded:
To install these games, I would copy the first two to the nes folder and the last one to genesis (which is actually an alias for megadrive).
Don't copy
zipfiles if that's what you got from the game catalog sites. Only copy the game ROM images contained inside thezipfiles, after you've extracted them.
At Retro Pie home screen, you should now see RetroPie (configuration), and other menu entries for each system that has games installed.
If you don't see any systems listed, enter and exit the Configuration screen to refresh: Left and Right to move selection to RetroPie; A button to activate that screen; then B button to exit back to the home screen.
Inside a game system menu, use Up and Down to find the game you want, and then A button to launch.
Don't forget you can use the B button to exit back to the home screen.
Once you launch a game, you can play it as you normally would.
If some of the controls aren't working, consult the Retro Pie manual for troubleshooting and configuration help.
Remember that "Hotkey Enable" button we configured on the controller? On my Gravis Gamepad I configured its Left Trigger button as "Hotkey".
To quit a game and return to the Retro Pie menu for the game system you were running, hold the "Hotkey" button and press the Start button. From there, you can exit back to the home screen with the B button.
The Raspberry Pi computer does not come with a physical power button on the main board or in its case.
You should shut down the Raspberry Pi when you're done with it for the day, to ensure that the memory card is not corrupted by an abrupt loss of power.
To shut down Retro Pie from the home screen, hit the Start button to activate the Main Menu, then navigate to Quit → Shutdown System. (Don't forget to use the A button to navigate down into menus.)
After the display goes blank and the internal red power LED on the Raspberry Pi goes out, unplug the Raspberry Pi's power or turn off the power strip that it's connected to. The next time you plug it back in or provide power, it will start back up automatically.
This policy contains information about your privacy. By posting, you are declaring that you understand this policy:
This policy is subject to change at any time and without notice.
Reader-contributed comments on Glump.net are owned by their original authors, who reserve all rights.
Comments rules:
Comments